Simple additive mixing using LED flashlights
WORKING WITH COLOURS:
Exploring Mixing Processes
Explore the simple additive mixing process with coloured LED flashlights
Details:
Middle-high school and up (Although younger students can play with coloured flashlights and notice and describe what happens when different coloured light beams overlap.)
Time: 20 minutes
Learning Outcomes:
1. Perform light mixing variations using LED lights and describe the perceived mixed colours.
2. Notice and describe how varying the distance of the flashlight impacts the perceived mixed colour.
Colour Concepts:
1. When distinct coloured sources of light enter our eyes, our eyes and brain generate a new mixed colour via the process of simple additive mixing.
2. The intensities of the light beams impact a mixed colour.
PART 1: MIXING GREENS
Figure 1. Green and white flashlights, and mini-stage.
Materials:
LED Flashlights (2 white, 2 green)
Option: mini-stage (See Mini-stage handout directions on building your own mini-stage. It facilitates holding the flashlights for the simple additive mixing exercises, but is not essential.)
Instructions:
Figure 2. Mixtures of green and white light beams. Notice the areas of vivid and pale greens.
This exercise needs to be done in a dark classroom – turn off all the lights and close the blinds.
Turn on one green and one white LED flashlight.
Overlap the light beams.
Describe the colour variations you see, in terms of their hue family and character.
Repeat the exercise, using 2 white and 1 green light beams, 1 white and 2 green light beams and 2 white and green light beams. How do these variations impact the colours you see?
Vary the distances of the flashlights to the coloured stage, and the angles of the light beams. How are the colours affected? Can you make pale, dark and muted variations of green?
PART 2: MIXING COLOURED LED LIGHT BEAMS
Materials:
LED Flashlights (1 red, 1 green, 1 blue)
Option: Mini-stage (see above for handout link)
Instructions:
This exercise needs to be done in a dark classroom – turn off all the lights and close the blinds.
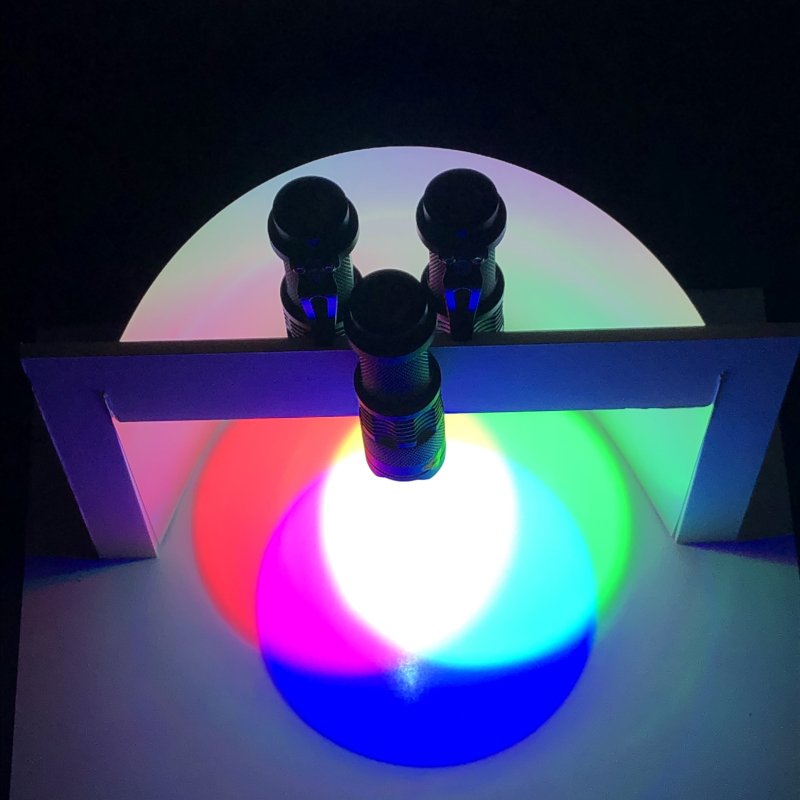
Turn on all flashlights, and overlap the light beams. If you are using the mini-stage, you can clip the flashlights as shown in Figure 3.
What colour results when mixing all 3 coloured light beams?
Try turning off one flashlight at a time, and seeing what colour results as 2 different coloured light beams overlap.
Try varying the distance and/or angle of one flashlight and describe how the mixed colour changes.
Figure 3. Demonstration of mixtures of red, green and blue LED light beams.
Figure 4. Demonstration of mixtures of red and green LED light beams.
Vocabulary:
Questions & observations:
How do you make pale variations of greens in Part 1?
What colour results when you overlap the red, green and blue light beams in Part 2?
What colour results when you overlap each set of two light beams in Part 2?
What happens to the mixture when you move 1 flashlight closer to and farther from the overlapping area? Try this with each flashlight in turn.
Option for younger students: Encourage them to play with the flashlights, and notice and describe the colours they see.
Option for older students: Encourage them first to play, but later to document the colours they see, and precisely note how they obtained each of those colours. Download the Handout TABLE-Mixing coloured light beams to use as a template for an investigation following the scientific method.
More to explore:
Try to get as many variations of the mixed colours using the LED flashlights as you can. If you have more flashlights, try adding those to the mix.
Create a table, and make a record of all the colour variations you see, and how you produced them.
What’s going on?
This exercise demonstrates simple additive mixing, where the light beams reflect off the white mini-stage, enter your eye, and then get detected by your cones. New colours are perceived as different wavelength combinations enter your eye from the various light sources. This activates your visual system in a new way, and generates a new colour perception.
Find out more:
See the glossary entry on the additive mixing process


